How to Treat Skin After Glue Exposure 🩹✨
The Glue Exposure Panic
You have glue on your skin. 😫 It is a moment of pure panic. Maybe it is Super Glue. Maybe it is nail glue. 💅 Maybe your fingers are stuck together. Or maybe it is sticky, tacky residue. This residue is from a tough bandage. 🩹 Your first instinct is to pull. You want to scrub it off. You want to pick it off. You must fight this instinct. Do not pull. 🚫 This is a guide on how to treat your skin. This is not just about removal. It is about removing the glue safely. It is about healing the skin after. Your skin is a delicate organ. We must treat it with care. ❤️ This guide will cover both types of glue. First, the hard glue. Second, the sticky residue. Then, we will cover the most important part. The aftercare. ✨
The Golden Rule: DO NOT PULL OR RIP 🚫
I must say this again. It is the most important rule. Do not force it. Do not pull your skin apart. Why? Nail glue and Super Glue are powerful. They are cyanoacrylates. The bond they form with your top skin layer... is stronger than the bond your skin layers have with each other. If you rip the glue off, you will not just remove the glue. You will rip your own skin off with it. 🩸 This creates a painful, open wound. It is a serious risk for infection. 🦠 We are not going to use force. We are going to use chemistry. 🧪 We will not pull the glue. We will dissolve the glue. This is the safe, painless, and effective method. It just takes patience. 🧘
Part 1: How to Remove Hard Glue (Super Glue / Nail Glue)
This is the scary one. Your skin is bonded solid. It is white and crusty. This glue (cyanoacrylate) is cured by moisture. Your skin's moisture is what made it hard. To remove it, we need a solvent. A solvent is a liquid that dissolves other substances. We will start with the gentlest solvents first. We will only escalate if needed.
Method 1: The Warm, Soapy Water Soak (Gentlest Method)
This method is for sensitive skin. It is the safest first step. It works by softening the glue's bond. It gets underneath the glue. What You Need:
- A large bowl
- Very warm water (not scalding!) 🔥
- A gentle soap (Dish soap like Dawn is perfect. It is a great degreaser.) 🧼
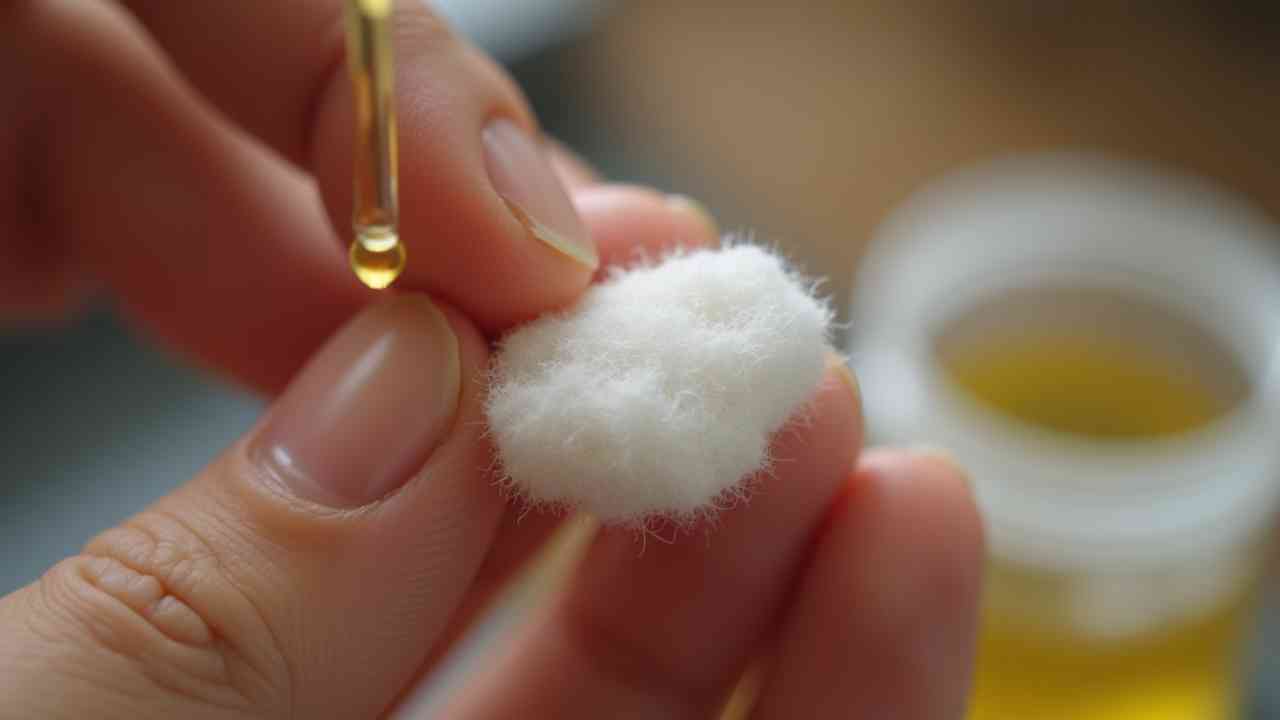
Method 2: The Oil Solvent (Best & Safest Method) 🥇
This is the best method. It is highly effective. It is also very gentle. The rule is: Like dissolves like. Adhesives are oil-based. A simple, skin-safe oil is a perfect solvent. It will dissolve the glue's bond. And, it moisturizes your skin at the same time. ✨ What You Need:
- A skin-safe oil. (Baby oil, mineral oil, coconut oil, olive oil 🥥, almond oil).
- Petroleum Jelly (Vaseline) also works perfectly. It is thick and stays in place.
- Cotton balls or a soft cloth.
Method 3: Acetone (The "Last Resort" Solvent) ☢️
The oil did not work. The glue is very stubborn. You are out of patience. It is time for the harsh solvent. Acetone. Acetone is the main ingredient in nail polish remover. 💅 It is one of the only solvents that truly dissolves cyanoacrylate quickly. But it is very, very harsh on skin. It is extremely drying. 🏜️ It will strip every natural oil from your skin. It can cause irritation. Use it with great care. What You Need:
- 100% Acetone Nail Polish Remover. (The "non-acetone" kind will NOT work. It must be pure acetone.)
- Cotton balls.
- A thick moisturizer for aftercare.
Part 2: How to Remove Sticky Residue (Bandages / Tape)
This is a different problem. The skin is not hard. It is tacky. 끈적끈적 It is covered in the sticky gunk from a bandage, K-tape, or medical dressing. This residue is also oil-based. Water and soap will not work. 🚫 We will use the same principles: solvents and friction.
Method 1: Oil Rub (Still The Best) 🥇
Oil is still the #1 choice. It is safe and effective. Pour Baby Oil or Olive Oil onto a cotton pad. This time, you do not need to wait 20 minutes. The residue is soft. It is exposed. Just rub the sticky area. Use firm, circular motions. The oil will combine with the residue. It will form little gummy balls. These will roll right off your skin. This is the best method for sensitive skin. It is perfect for tattoo aftercare. (Removing the "second skin" bandage). 🎨 Wash with soap and water after.
Method 2: Rubbing Alcohol (The Fast Fix) 🧪
This is the other fast, effective solvent for residue. 70% Isopropyl Alcohol (Rubbing Alcohol) works perfectly. Soak a cotton ball. Rub the sticky patch. The alcohol will break the bond instantly. The gunk will lift onto the cotton ball. ⚡ This is the method hospitals use. It is fast and sterile. It is also very drying. 🏜️ You must wash the alcohol off. You must moisturize heavily after. (See Part 3).
Method 3: The Shower Scrub 🚿
This method uses friction. It is for light residue. Take a warm shower. Let the steam and heat soften the glue. Use a washcloth or a loofah. 🧽 Use a good, oily soap (like Dove). Or use a body scrub. Scrub the area firmly. The friction from the cloth will roll the adhesive off. This is a safe, simple, and effective method.
Part 3: The Treatment (Essential Aftercare) 🩹✨
This is the most important part of "treating" your skin. You have now removed the glue. But your skin is not okay. You have just attacked it with a solvent. (Oil, alcohol, or acetone). You have stripped its natural moisture barrier. 🛡️ The skin is now raw, dry, and irritated. It is vulnerable. You must now repair that barrier. This is a 3-step process.
Step 1: Gentle Cleansing
You must wash away the solvent. You cannot leave acetone or alcohol on your skin. Use a gentle, hydrating cleanser. 🧼 Do not use a harsh, "squeaky clean" soap. Do not use bar soap. 🚫 Use a mild cleanser. (Like CeraVe, Cetaphil, or a gentle body wash). Use lukewarm water. Not hot water. Hot water strips even more oils. Pat the skin dry. Use a soft towel. Do not rub.
Step 2: Hydration (Add Water Back)
Your skin is now clean, but it is "thirsty." It needs humectants. These are ingredients that pull water in. 🧲 The best humectant is Hyaluronic Acid. 💧 If you have an HA serum, apply it now. Apply it to your still-damp skin. If you do not have HA, that is okay. The next step is the most critical.
Step 3: Occlusion (Lock the Moisture In) 🔒
This is the non-negotiable step. You must seal the skin. You need a thick, heavy, occlusive barrier cream. This cream will act as a "bandage." It will be your new, temporary skin barrier. It will allow the skin underneath to heal. Do not use a light, fluffy, scented lotion. It is useless here. 🧴 You need the heavy-duty products. Look for these ingredients: 1. Petrolatum (Petroleum Jelly) This is the king. Vaseline is your best friend. 💎 It is the #1 occlusive. It blocks 99% of water loss. It is the best skin protectant. Slather a layer of Vaseline over the entire area. 2. Ceramides These are the lipids that make up your actual skin barrier. A ceramide-rich cream is a "barrier repair" cream. Creams like CeraVe or La Roche-Posay Cicaplast are perfect for this. 💙 3. Lanolin Creams like Aquaphor (which is 41% Petrolatum) are also excellent. The "Slugging" Method: Apply your thick cream or Vaseline. Apply a generous layer. Then, if you can, cover the area. 🛌 If it is on your hand, put on a cotton glove. Go to sleep. If it is on your foot, put on a cotton sock. This is called "slugging." 🐌 You will wake up with new, soft, healed skin. This is the ultimate treatment.
When to See a Doctor 🩺
Sometimes, this is not a simple home fix. You must see a doctor if you have these signs. 1. You Ripped the Skin. You panicked. You pulled. The skin is open and bleeding. 🩸 You must now treat this as an open wound. Wash it gently with soap and water. Apply an antibiotic ointment (Neosporin). Cover it with a clean bandage. Watch it for signs of infection. 2. Signs of Infection. The area is not getting better. It is getting worse. It is hot to the touch. It is swelling. It is oozing yellow or green pus. 🤢 You have a fever. This is an infection. You need a doctor. 🧑⚕️ 3. Signs of a Chemical Burn. You used acetone. Or you used an industrial glue (like Epoxy). The skin is dark red or purple. It is blistering. It is in severe pain. This is a chemical burn. 💥 Rinse the area with cool water for 15 minutes. Go to Urgent Care. 4. Signs of an Allergic Reaction. This is common with bandage adhesive. It is called contact dermatitis. The skin is not just sticky. It is red. It is itchy. It is raw. 🥵 It may have a red, square rash. The exact shape of the bandage. You must treat this with care. Use the oil method only. Do not use alcohol or acetone. Wash the area. Apply an over-the-counter 1% Hydrocortisone cream. This will calm the allergic inflammation. Then, cover it with Vaseline.
Conclusion: Be Patient. Be Gentle. Be Oily.
Treating skin after glue exposure is a 3-part process. 1. Remove the Glue (Gently!) Use oil as your first and best tool. 🥥 Let it soak for 20 minutes. Rub gently. Be patient. Use acetone only as a last, careful resort. 🧪 2. Clean the Solvent (Wash) Wash the area with a mild, gentle soap. 🧼 3. Treat the Skin (Occlude) This is the most important part of "treatment." Apply a thick, occlusive barrier cream. 🧴 Use Vaseline, Aquaphor, or a CeraVe cream. This will heal the stripped, irritated skin. It will restore your skin barrier. Your skin is an amazing organ. Give it the gentle care it needs. 🌟