How to Remove Adhesive from Skin 🩹✨
The Sticky Problem: Adhesive Residue
You pull off a bandage. 🩹 Or you remove medical tape. Or kinesiology tape. Instead of a clean removal, you are left with a sticky, tacky mess. 😫 This adhesive residue is stubborn. It is annoying. It clings to your skin. It picks up lint and dirt. It looks gray and dirty. It can also be very painful to remove. 😖 Scrubbing at it with your nails is a bad idea. This can make your skin red, raw, and irritated. The adhesive is designed to stick to you. It is made from pressure-sensitive adhesives (PSAs). These glues are oil-based. They are designed to bind with the oils and proteins on your skin. This is why simple water does not work. 🚫 Water and oil do not mix. Water just rolls right off the sticky patch. You need a new strategy. You need a solvent. 💡 This guide will show you how to remove adhesive. We will use simple, safe products. You probably have them in your home right now. We will start with the gentlest method first. We will save the harsh methods for last. Let's get that sticky gunk off your skin.
The Golden Rule: Oil Dissolves Glue 🔑
This is the most important rule of adhesive removal. The principle is "like dissolves like." Most medical adhesives are oil-soluble. 🧪 This means an oil-based product is your best weapon. Oil is the gentlest and most effective method. It is safe for almost all skin types. It is even safe for sensitive skin. It also moisturizes your skin at the same time. ✨ The key to this method is not scrubbing. It is patience. You must give the oil time to work. ⏳ The oil needs to soak into the adhesive. It needs to break down the "stickiness." Do not just wipe and rub. You must let it sit. This is the secret to a painless, easy removal.
5 Safe Methods to Remove Adhesive Residue
Here are five methods to try. Always start with Method 1. It is the kindest to your skin. Only move to other methods if the oil fails. The final steps are always the same. You must wash and moisturize. 💧
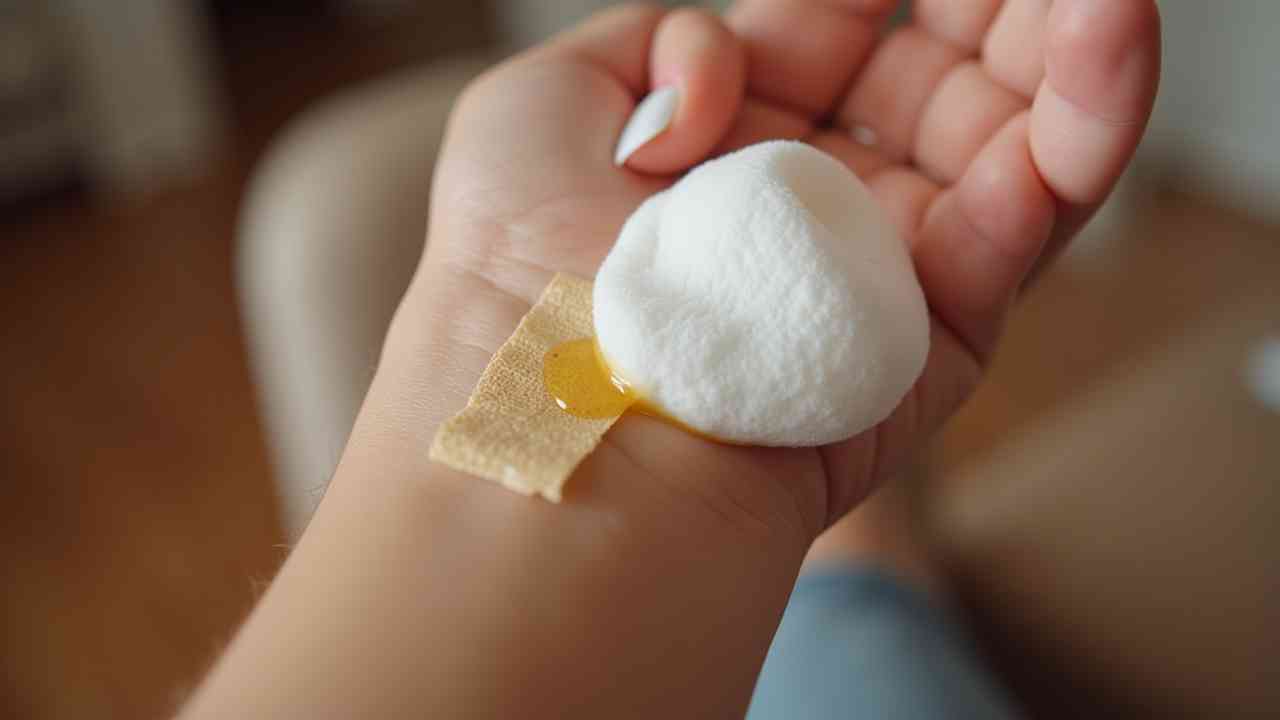
Method 1: The Oil Soak (Best & Safest Method) 🥥
This should be your first attempt. It works 90% of the time. It is perfect for removing stubborn Band-Aid residue. What You Need:
- A gentle, skin-safe oil.
- Baby Oil: This is the classic choice. It is mineral oil with a light fragrance.
- Coconut Oil: A fantastic choice. It is solid, so it is less drippy. 🥥
- Olive Oil: Everyone has this. It works perfectly.
- Petroleum Jelly (Vaseline): This is a great, thick occlusive.
- Cotton balls, cotton pads, or a soft cloth.
Method 2: Rubbing Alcohol (The Fast Solvent) 🧪
This is the "medical" method. It is fast and effective. But it is harsh. Alcohol is a powerful solvent. It dissolves almost all sticky glues. It is perfect for "second skin" (Saniderm/Tegaderm) residue. This residue is often acrylic, not oil-based. What You Need:
- 70% Isopropyl Alcohol (Rubbing Alcohol). 91% is often too strong.
- Hand Sanitizer Gel (This works well! It is mostly alcohol and is less drippy).
- Cotton balls.
Method 3: Warm Water & Friction (The Shower Method) 🚿
This method is for light residue. Or for very sensitive skin. It relies on heat, moisture, and mechanical friction. The Step-by-Step Process: Step 1: Take a Hot Shower or Bath. The goal is to get your skin warm and damp. 🧖♀️ Spend 10-15 minutes in the warm water. Let the steam soften the skin. The heat and moisture will soften the adhesive glue. Step 2: Use a Washcloth and Soap. Get a washcloth. (A terrycloth towel is best. It has a good "scrub"). Apply a generous amount of soap. 🧼 A soap with oils is great. (e.g., Dove, or a soap with shea butter). Step 3: Scrub (Gently!) With the soapy washcloth, scrub the sticky patch. Use firm, circular motions. You will need to apply some pressure. The friction from the cloth will slowly roll the adhesive off. This method takes the most time. It requires the most "elbow grease." But it is very safe. It exfoliates your skin at the same time. Be patient. Do not scrub so hard that your skin turns red or raw.
Method 4: Medical Adhesive Removers (The Pro Tool)
If you deal with this problem often, buy the real solution. 🏥 This is for athletes using tape. Or for patients using medical monitors. You can buy medical adhesive remover wipes. 🛍️ Brands like "Uni-Solve," "Tac Away," or "Remove" are common. They are sold at pharmacies or online. They are individual pads. They are soaked in a special, skin-safe solvent. This solvent is designed for one job. It dissolves medical glue. It does so gently. You just open the packet. You wipe the skin. The glue dissolves. This is the easiest, fastest, and safest method. It is worth the cost.
Method 5: The "Kitchen Sink" Combo
This is a last-resort hack for very stubborn, thick glue. It combines the oil method and the abrasive method. What You Need:
- Baking Soda
- Coconut Oil (or Olive Oil)
What to do for Sensitive Skin? (e.g., Tattoos, Wounds)
What if the skin is brand new? Or very sensitive? This includes skin after removing a tattoo bandage (like Saniderm). 🎨 It also includes skin on the elderly or on children. You must be extremely gentle. The skin is compromised. DO NOT USE ALCOHOL. 🚫 DO NOT USE VINEGAR or ACETONE. 🚫 DO NOT SCRUB. 🚫 These will cause intense pain. They will damage the healing skin. You must use Method 1 (Oil). It is the only safe option. You must be extremely patient. 1. Get in a warm shower. Let the water soften the glue. 🚿 2. Get out. Gently apply a heavy coat of coconut oil. Or olive oil. 3. Let it sit for 15-20 minutes. No exceptions. Let it work. 4. Go back to the shower. Use an unscented, antibacterial soap. 🧼 5. Use only your clean fingertips. No washcloths. No loofahs. 6. Gently rub the oily, sticky area. The glue should start to roll off. 7. This may take several minutes. Be patient. Be gentle. 8. It is better to leave a little residue behind... than to scrub your new tattoo raw. The rest will come off tomorrow. 9. Pat dry with a clean paper towel. Apply your tattoo aftercare lotion.
What NOT to Use: The DANGER LIST 🛑
Do not get desperate. Do not use these products. They will remove the glue. But they will also remove your skin. 🤕 They can cause chemical burns. They can cause severe irritation. 1. Acetone / Nail Polish Remover: This is far too harsh for your skin. It is a powerful solvent. It is toxic. It is for nails, not skin. It will cause extreme dryness and irritation. 2. Goo Gone / Goof Off: These are industrial-strength solvents. They are for cleaning floors or tools. They are NOT for human skin. They are toxic. They can cause chemical burns. Never, ever use these on your body. ☣️ 3. WD-40: This is a penetrating oil for metal. It is not for skin. It is toxic. 4. Harsh Scrubbers: Do not use a Brillo pad. Do not use the green side of a kitchen sponge. Do not use a hard-bristle brush. These tools will create micro-abrasions (tiny cuts) in your skin. This breaks your skin barrier. It invites a bacterial infection. 🦠
The Final Step: Aftercare is Everything
You did it. The adhesive is gone. ✨ Your skin is clean. But it is not happy. 😥 You have just stripped it of its natural oils. (Especially if you used alcohol). The skin barrier is now weak. You must repair it. This final step is the most important for skin health.
1. Wash Gently
Wash the area one last time. Use a gentle, lukewarm water. Use a mild, hydrating soap (like Cetaphil or Dove). This removes any leftover solvent or oil. Pat the skin dry. Do not rub it. 🧖♀️
2. Moisturize Immediately
This is the final, critical step. 🔑 While the skin is still slightly damp, apply a high-quality moisturizer. You need a barrier repair cream. Not a light, fluffy, scented lotion. Look for ingredients like:
- Ceramides: These are the "bricks" of your skin barrier.
- Hyaluronic Acid: This pulls moisture back into the skin.
- Petrolatum (Vaseline): This is the ultimate seal. It locks in moisture.
Conclusion: Be Patient, Be Gentle, Use Oil
Removing adhesive from skin is a test of patience. Not strength. Aggressive scrubbing will only hurt you. 🚫 The secret is to use a solvent. 💡 Start with the gentlest, safest solvent: Oil. 🥥 Let it sit for 15 minutes. Let it do the work for you. Rub gently in circles. The glue will lift. If oil fails, use rubbing alcohol. Be quick. And always wash and moisturize after. This simple process will leave your skin clean, smooth, and healthy. 🌟